Showing posts with label Recipes. Show all posts

Polenta, My New Favorite Food

It's been awhile since I posted a recipe and I think it's time I share one today, especially since I made a super delicious meal yesterday. My recent favorite food is polenta. Ever since I learned that I am allergic to gluten I have been experimenting with various substitutes. Polenta is great because it's easy to make and can be layered with any toppings or sauces of your choice. Luckily I had many vegetables stocked in the fridge to work from. I chose asparagus, shiitake mushrooms, yellow bell pepper, and onion for toppings. I like my polenta to be the consistency of porridge so I made it last to keep it from setting. Try it out for your next meal. I promise you will fall in love with it. Enjoy!


{Polenta}
Serves 4 people

Ingredients: 
1 3/4 cups cormeal - I used Bob's Red Mill Organic Corn Grits
6 cups of water
1 1/2 teaspoon salt
1-3 tablespoon unsalted butter
1/2 cup of Parmesan cheese

Directions:
In a medium sauce pan add 6 cups of water and salt and bring to a boil. Gradually whisk in the cornmeal. Reduce the heat to low and add butter and Parmesan cheese and whisk the mixture until it thickens to the consistency of porridge about 15 minutes.

{Caramelized Onions and Vegetable Toppings}

Ingredients: 
1 1/2 tablespoon butter
1 tablespoon olive oil
4 large shiitake mushrooms
1 yellow bell pepper
1 yellow onion
15 thin stalks of asparagus
1 garlic
salt and pepper to taste
Parmesan cheese

Directions:  
  • Place the skillet over medium heat and add butter and olive oil. Add sliced onions and garlic stir them to coat them with butter and oil. Close the lid for 10-15 minutes. Check occasionally to stir the onions. Once onions are caramelized add rest of the vegetables.  
  • Stir the shiitake mushrooms, yellow bell pepper, and asparagus in the skillet and cook for 5 minutes. Add salt and pepper to taste
  • Add the vegetables on top of polenta and sprinkle Parmesan cheese. 


All About Garlic


Do you love garlic as much as I do? Garlic is an essential ingredient in my cooking. Whenever recipes ask for garlic I often add a clove or two more than it asks for. Garlic adds a lot of flavor which helps me cut down on salt. But as much as I love garlic I can't say I like the pungent smell of garlic, or of it on my hands from the peeling and chopping. It turns out there's solution to all this. There's a very simple, and somewhat hard to believe, way to eliminate garlic smell by rubbing hands on stainless steel surfaces. I learned this from Lucy, my mother-in-law. I usually rub them on my stainless steel kitchen facet after washing my hands. It works like magic every time. 

And for peeling and chopping of garlic, there's a simple method to this as well. First hit the head of the garlic bulb with base of a cup and break them apart. Grab two metal bowls and put the garlic cloves into a bowl, and close the top with the other and shake really hard, about 30 seconds. Here's a demo from Todd Coleman from Saveur Magazine. You will love the result!

Since garlic is an ingredient I use all the time, it saves me time to prepare it ahead of time. I usually chop up about 20-25 garlic cloves and store them in a small jar with 1 cup of olive oil. It's good for up to two months in the refrigerator. 

So there it is, everything I know about garlic. Enjoy your garlic!


Healthy & Crunchy Kale Chips

I value recipes that are simple, tasty and good for you. I am talking about kale chips. I made some for a dinner get-together a few weeks ago and people loved it. It was a part of the appetizers along with grilled cheese sandwiches. I always like sandwiches with something crunchy, and kale chips made a wonderful substitute for potato chips. This is a very simple recipe with only three ingredients - kale, olive oil, and salt. This also makes a perfect TV watching snack. Recipes and instruction below.

I forgot to set the timer on the oven, I lost track of time and ended up over baking the kale leaves. Some are slightly burnt but it made it more crunchy. Don't forget to set the timer!


{Ingredients}
1 head of kale
2 table spoon olive oil
salt to sprinkle

{Instruction}
Preheat the over for 325 F
Thoroughly wash and dry kale. Once they are dried you can either pull the leaves from the stem into bite sizes, or cut them into 1.5" pieces. Discard the stem. Place them in a large bowl and toss them with olive oil and salt. Spread them out evenly onto a baking sheet and bake for 10-15 minutes. Turn the leaves half way.


All images and design © 2013 Hyun Yu. All rights reserved.
 

Tasty Honey & Vanilla Ice Cream

We recently picked up an ice cream maker and started experimenting with various ice cream recipes. Out of all the flavors we tried my husband loves this Honey, Vanilla and Light Brown Cane Sugar recipe the best, and I agree. Unlike before, we never run out of ice cream. Whenever there's a sweet craving, a few scoops of ice cream do the trick. 

My husband often makes the ice cream and I assist. I would say my favorite part of the process is putting the liquid custard into the ice cream maker and watching it turn and turn until it grows and thickens -- most exciting and magical. And of course tasting a spoonful of fresh ice cream before putting into the freezer is most rewarding.

Check out the recipe below and try it out. I promise you will be glad you did. Love to hear how it turned out.

Tasty Honey & Vanilla Ice Cream

Ingredients: honey, vanilla extracts, cane sugar, whole milk, half and half


Ice Cream Mixture

Cuisinart ICE-21 Ice Cream Maker

Thickening of Ice Cream - It's Magic!


Ingredients

2 cups half-and-half
1 cup whole milk
1/2 cup cane sugar
3 tablespoons honey
1 teaspoon vanilla extract


Directions
Combine all ingredients in a medium saucepan and place over medium heat. Stirring occasionally, bring the mixture to 170 degrees F. (when it's barely simmering). The mixture will thicken and become custard like. Remove from heat and allow to cool slightly.  Pour mixture into lidded container and refrigerate mixture overnight to mellow flavors and texture.

Freeze mixture in ice cream freezer according to the product's instructions. Once the volume has grown by 1/2 to 3/4 times, and reached a soft serve consistency, scoop the soft ice cream into a lidded container and harden in the freezer at least 1 hour before serving. (Some bites of fresh soft ice cream right out of the machine, however, is its own special reward!)


All images and design © 2013 Hyun Yu. All rights reserved.


Simple Korean Egg Custard

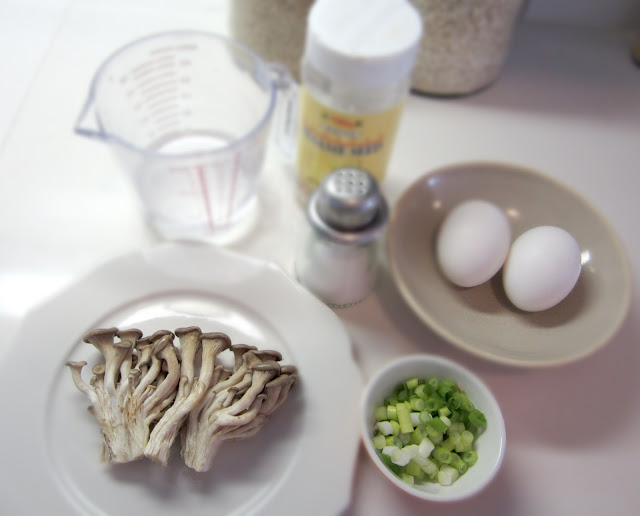
Steamed Egg Ingredients

Prepped Egg in the Pot Ready to be Steamed

Steamed Egg!

I love simple dishes that taste good and fill you up. This is one of those. This is a Korean style steamed egg called gyeranjjim. I say this dish is good for any meal of the day. Another wonderful thing about this dish is you can customize to your taste. I added mushrooms but any other vegetables can be added such as carrots, zucchini, corn, peas and many more including meat. Try it out and share your modifications.

Ingredients
2 eggs
1/4 teaspoon salt
1/2 cup water, plus more for filling pot
1/2 scallion, chopped
1/3 cup of chopped mushroom
1/4 teaspoon toasted sesame seeds

Directions
1. Whisk the eggs, mushroom and add the water & salt and mix well. Pour egg mixture into heat proof bowl and place the bowl in a large pot filled with water. Making sure the water level is no more than 3/4 up the heat proof bowl. Close the lid of the large pot to steam.

2. Steam the egg custard covered for 15 minutes on medium heat. Add the scallions and sesame seeds and steam for an additional 5-7 minutes.

Serve hot. Enjoy!

Flowers and Salad Pizza

Flowers from an Alley

Stone Ground Whole Wheat Salad Pizza

Happy Friday! This is what we had for dinner tonight. I threw in ingredients in hand to make a quick pizza, my version which turned out delicious and healthy too. Here's a recipe for you to try out. I hope your weekend is full of flowers and healthy treats. 

Ingredients:
Stone ground whole wheat pita
Organic spring mix
Roasted pepper spread
Feta cheese 
Sharp cheddar shredded cheese
Red bell pepper

Direction:
Spread the roasted pepper spread evenly over the pita bread. Sprinkle with sharp cheddar cheese and top it with thinly sliced bell peppers. Bake for 5 to 7 minutes in the toaster oven at 450, until the the bread is toasted and cheese is melted and bubbly. Cool for about 5 minutes and top it with mixed green salad and feta cheese. Enjoy!


Korean Pancake Anyone?

Chopped leek, red bell pepper, hot pepper, and zucchini

Chopped leek, red bell pepper, hot pepper, and zucchini mixed with flour and water
Korean pancake (pa jun)
This is one of my favorite foods of all time. Here's the recipe. Try it out and let me know what you think. Enjoy!

Ingredients:
  • 2 cups flour
  • 2 cups water
  • 1 bunch of  leek or green onion
  • Half zucchini
  • half red bell pepper
  • 2 hot pepper
  • 1 tsp salt
  • Oil for cooking

Preparation:

  1. Mix all ingredients together and let sit for about 10 minutes. Check consistency before cooking – batter should be a little bit runnier than American pancake batter, so that the Pa Jun cooks quickly and evenly.
  2. Heat a saute pan over medium heat and coat with a thin layer of oil.
  3. Pour batter to fill pan in a thin layer (about 1/3 of your batter should fill a regular saute pan).
  4. Cook for 3-4 minutes until set and golden brown on bottom.
  5. Turn over with help of spatula or plate (or flip it in the air if you are good at that) and finish by cooking 1-2 more minutes, adding more oil if necessary.
  6. Serve with soy sauce with sesame seeds
Related Posts Plugin for WordPress, Blogger...